HOWTO: Build a deployable Content Type for SharePoint 2010
Open Visual Studio 2010, select SharePoint.
Select Empty SharePoint Project.
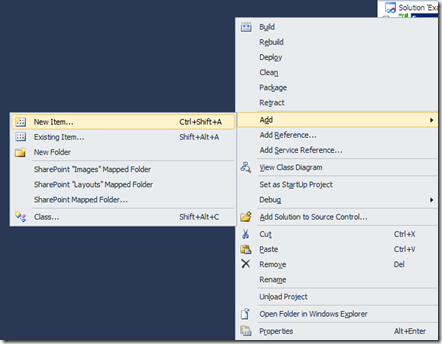
Right click the project and add a new item 
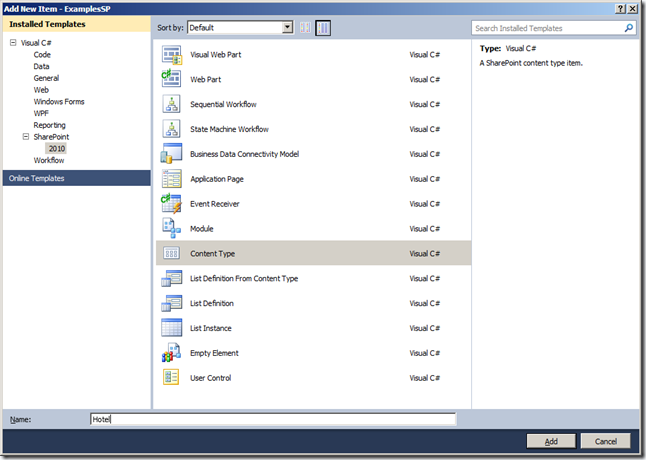
Select Content Type, name it Hotel 
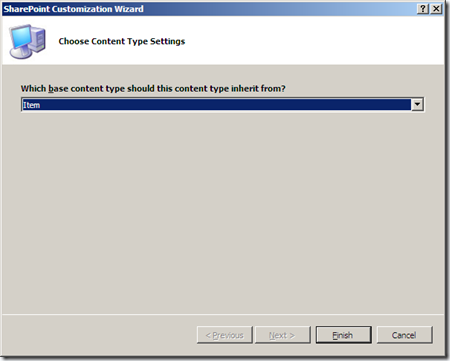
Select Item as Base Content Type
This will result in the following xml:
- <?xml version="1.0" encoding="utf-8"?>
- <Elements xmlns="http://schemas.microsoft.com/sharepoint/">
- <!– Parent ContentType: Item (0x01) –>
- <ContentType ID="0x01007319db2fac804824ab4fec5c3c2d2208"
- Name="Hotel"
- Group="Travel Agency"
- Description="This Content Type described a hotel that can be booked by the Travel Agency"
- Inherits="TRUE"
- Version="0">
- <FieldRefs>
- </FieldRefs>
- </ContentType>
- </Elements>
Note that I already changed the name, group and description to something more meaningful.
A content type is nice, but the real use comes from assigning some fields to it and making it available in a list. (our content type is based on item). The minimal xml for a field in a content type is the following:
- <Field ID="{8617CAAA-45D0-4C81-85C9-D1F7BAF99580}" Group ="Travel Agency" Name="StarsHotel" DisplayName="Number of Stars" Type="Number" />
You need to give a field an ID (Guid), a name and a type. For a list of the available types you can check out my blog post on available field types. As we are basing our content type on the item content type, we will already have a title field (which we will be using for the name of the hotel. Let’s add the following properties to our hotel
- Number of rooms – Number
- Pool – Yes/No
- Bar – Yes/No
- Stars – Number
Once we added all the fields, we will be adding a reference to these fields (who will result in site columns) in our content type with following syntax:
- <FieldRef ID="{8617CAAA-45D0-4C81-85C9-D1F7BAF99580}" Name="StarsHotel"/>
If you did all that correctly you should have the following xml.
- <?xml version="1.0" encoding="utf-8"?>
- <Elements xmlns="http://schemas.microsoft.com/sharepoint/">
- <!– Parent ContentType: Item (0x01) –>
- <Field ID="{24A3D7D7-EF78-4184-8DA0-E8FC019773AD}" Group ="Travel Agency" Name="Rooms" DisplayName ="Number of Rooms" Type="Number" />
- <Field ID="{E76BCA8A-3385-40E2-AC27-2A04F04F7B49}" Group ="Travel Agency" Name="Pool" DisplayName ="Pool Available" Type="Boolean" />
- <Field ID="{C0890629-8B34-4713-B8C0-61D0D84B6C96}" Group ="Travel Agency" Name="Bar" DisplayName ="Bar Available" Type="Boolean" />
- <Field ID="{8617CAAA-45D0-4C81-85C9-D1F7BAF99580}" Group ="Travel Agency" Name="StarsHotel" DisplayName="Number of Stars" Type="Number" />
- <ContentType ID="0x01007319db2fac804824ab4fec5c3c2d2208"
- Name="Hotel"
- Group="Travel Agency"
- Description="This Content Type described a hotel that can be booked by the Travel Agency"
- Inherits="TRUE"
- Version="0">
- <FieldRefs>
- <FieldRef ID="{24A3D7D7-EF78-4184-8DA0-E8FC019773AD}" Name="Rooms"/>
- <FieldRef ID="{E76BCA8A-3385-40E2-AC27-2A04F04F7B49}" Name="Pool"/>
- <FieldRef ID="{C0890629-8B34-4713-B8C0-61D0D84B6C96}" Name="Bar"/>
- <FieldRef ID="{8617CAAA-45D0-4C81-85C9-D1F7BAF99580}" Name="StarsHotel"/>
- </FieldRefs>
- </ContentType>
- </Elements>
Let’s deploy that to our SharePoint Server.
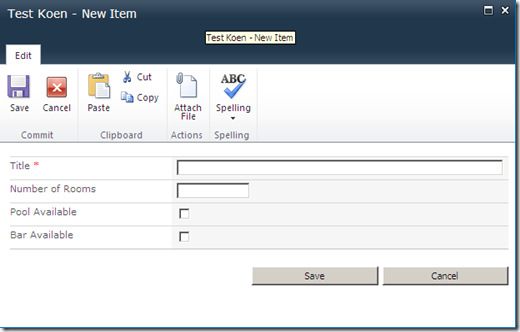
In the site settings of the site collection that we are deploying to, you should see the site columns under Travel Agency and you should see the Content Type under Travel Agency as well. You now succesfully deployed your content type. Once you link it to a list you end up with a hotel content type in your list.
In my next blog post I’ll handle linking this content type to a list in your project instead of doing it in the UI.
-
April 28, 2010 at 1:12 pmHOWTO: Create a List and bind a Content Type to it in SharePoint 2010 « Koen’s Weblog


